Here are two DIY photo back drops that are affordable and easy to make! I was recently at a conference and one of the speakers was Christine Pittman, of Cook the Story. Christine spoke about food styling and photography. I was really excited to hear how she created back drops and “table tops” for her photos. I remember thinking..”Even I could do that!” As soon as I returned home, I headed for Home Depot and started collecting my supplies!
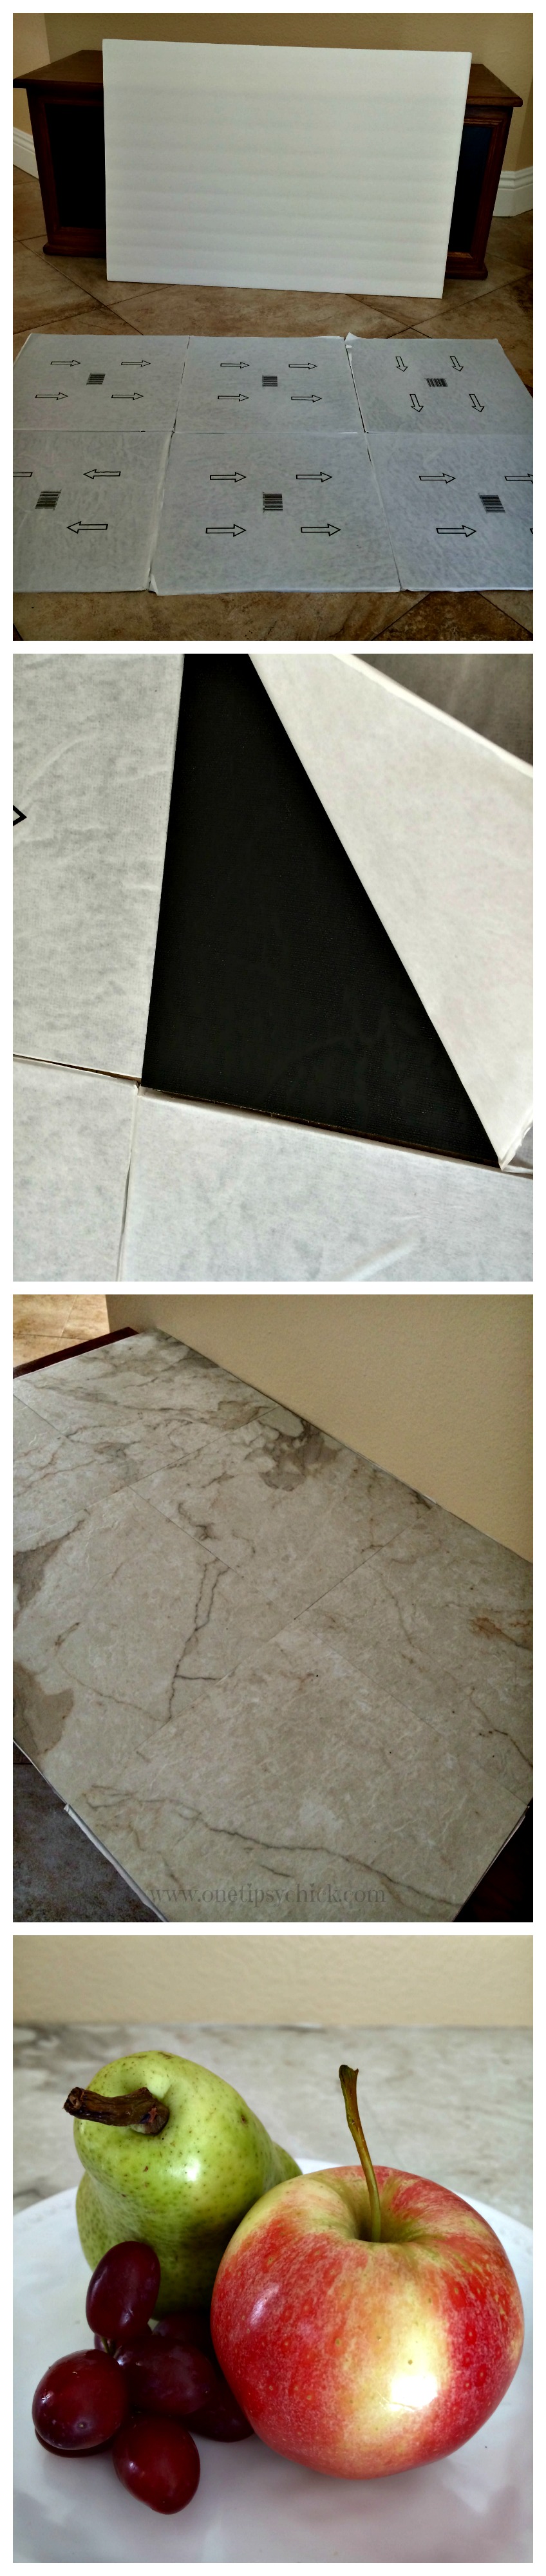
In this first photo, I created a “marble table top”. I purchased 6 12″x12″ peel and stick tiles for $.99ea. It was suggested that we attach them to either wood or even a foam board. I happened to have a foam board, so I used it, but I think I would go with a light weight, thin board next time. Lay out your tiles in the pattern you prefer. Measure out your surface. Once you have determined where you want to place your tiles, carefully peel the backing off and firmly press them into place. Make sure they are lined up tightly and placed evenly on the board. Allow to set for awhile, then you are ready to use your back drop! Total Cost: $8! I don’t know whether you have priced out back drops before, but when I was looking, they were between $20-40 and were made of paper!
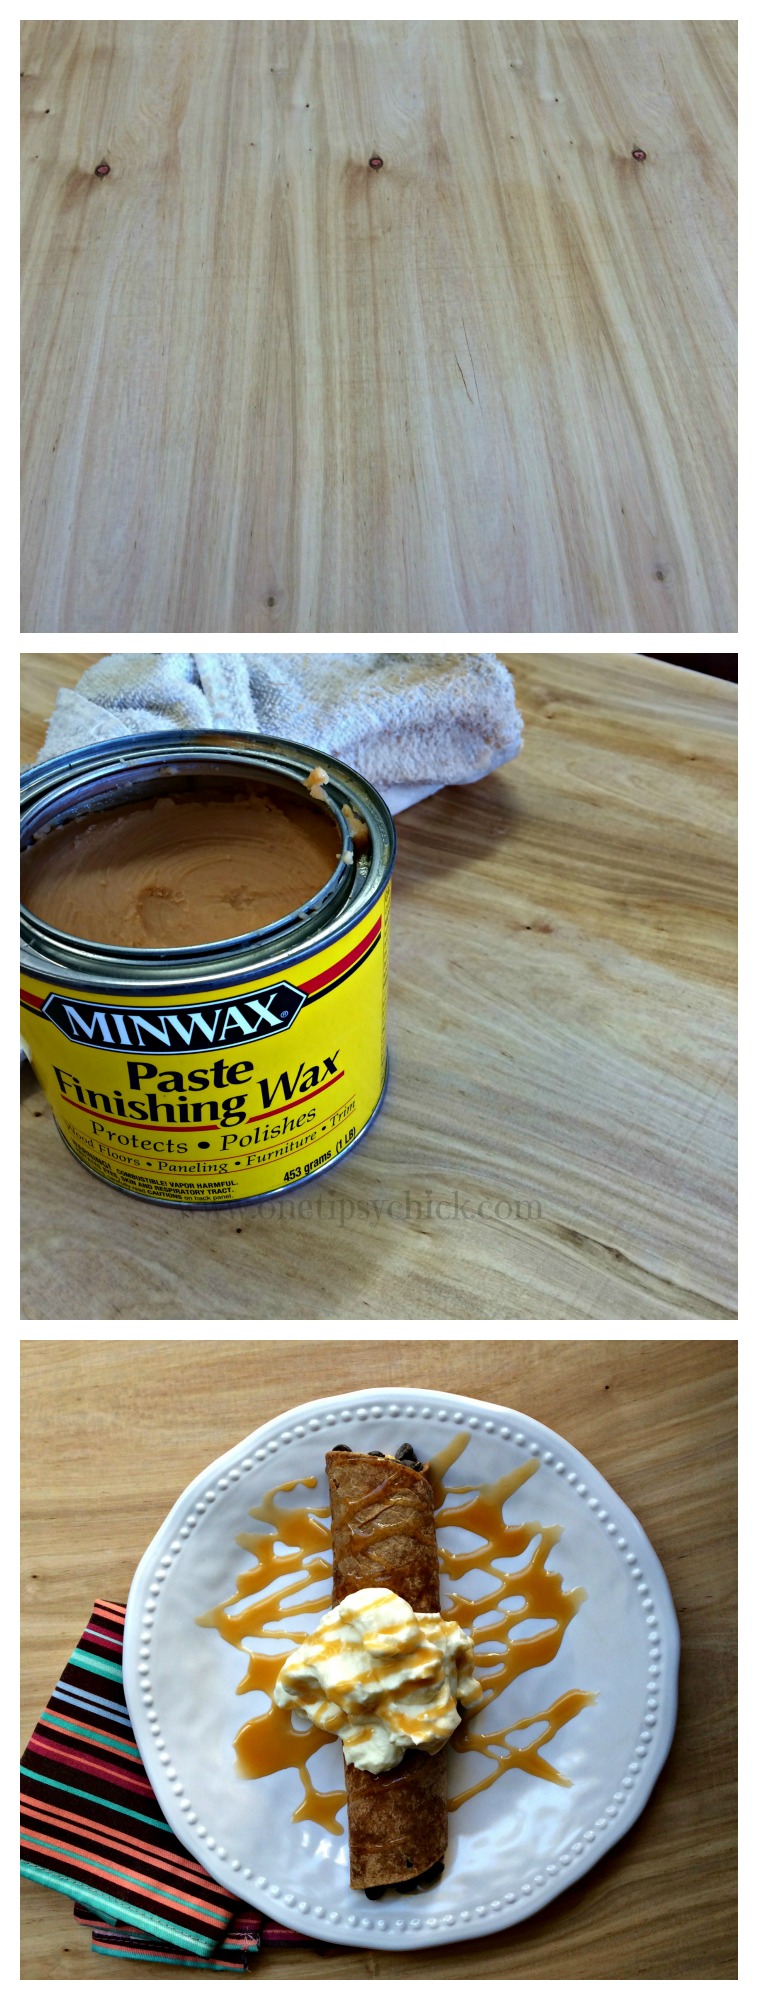
The second table top was made from a piece of unfinished wood paneling. The approximate size is 25″x48″. I didn’t save my receipt, but I know this board was under $10. I wanted a neutral table top that didn’t take a way from the items photographed. I didn’t want to stain it either, so I opted to seal it instead. I used some Minwax Paste Finishing Wax to make it less porous in case something spilled on it. I had a can of the wax, which I purchased for another project and paid $9.99 for it. First I wiped down the board with a cloth. Then I used a clean cloth to apply the wax. Scoop out some of the wax with your cloth. Gently rub it in a circular motion until the surfaced is completely and evenly covered. It slightly deepened the color of the wood as you can see in the second photo and is just perfect! If the edges of the wood are rough, use some 220 grit sand paper and a hand block to smooth them out. And that’s it! You’ve now created a “faux” table top/back drop for your photos!
 You can also paint the reverse side of this board. Simply choose a color and either leave it alone or once dry, dilute some white paint and add a wash over it for a shabby chic look. And if you get tired of it, then paint it again! The possibilities are endless!
What a great idea! I love Minwax! Thanks!
Very cool. I need to do this! I’ve always wondered his bloggers have so many different tabletops…
That’s awesome! I can definitely use something like this. Thanks for sharing!
I need to do the peel and stick one. I saved some of the old flooring when my kitchen had to be redone so I have honey oak, but I could put some peel and stick marble on the back and have a two and one!
thanks for the tip.
Yes, thats a good idea. At some point, I plan to paint the other side of my wood panel.
These are such great ideas! Pinning for later. Later probably being tomorrow because I really want to do this now!
Great ideas! We are always coming up with fun and unique ways to take pictures. We use a lot of scrapbook paper for smaller things around our home.
Thanks Kara! I love using scrapbook paper, though I often forget all about using it! Thanks for the reminder!
Great ideas! I will have to try some of these…thanks for sharing!
Great ideas! I can’t way to head over to Home Depot and see what I can discover. So simple and yet something I would never have thought to do on my own. Love it! Thanks for sharing this with all of our Let’s Get Real readers as well.
These are great tips. I am always looking for new background ideas and you’ve just planted a seed for me. Off to Home Depot to see what I can find!
Great Idea! I’m tired of using the same backdrop in every shot, this gives me some ideas on variety that don’t cost a fortune! Thanks.
Thanks so much for this useful tutorial. I’ll be personally pinning this as well as to #theWeekendSocial board. Hope to see you again Thursday 9:00 PM EST. http://www.theKitchenChopper.com
What great ideas! I especially love the peel & stick tile idea. Classy & EASY! Here I come Home Depot!
I really like the stick-on tile one. I even have a box of them leftover from when I redid my daughter’s bathroom. And I was just going to give them away! Ha! Not anymore! I usually use use my kitchen table but it’s a very dark wood and it doesn’t always work well for photos.
I had the same issue and now I love the tiled tabletop!
I seriously need some backdrops! Thanks for the reminder.. stopping by from sits girls! 🙂
What a great idea! I don’t photography food, but I do take tons of other photos. I will have to remember this! Linking up from SITS. 🙂
Thank you Alishia!
Great ideas. I need to make something. I just use whatever I find (like cabinets that haven’t been fully painted yet).
Thank you for sharing these tips. I don beauty product reviews and some of these suggestions are very helpful for me. I especially like the wood panel idea!
I am always looking for more ideas for photo back drops. I feel like mine are the same over and over. Thanks!
Seriously, that stick on tile idea? I just had a “duh, Jen, why didn’t you think of that?” moment. Thank you for inspiring me {as I run off to Menards to get supplies}.
Great ideas, I need to make one of these!
What great ideas! I love the wood paneling one.
Great ideas! Something I can do this holiday vacation.
This post reminded me that I need to put these on my to do list! I have been wanting to make backdrops for a long time, but I just have not done it yet.
Aimee @ Captivatingcorner.com
For the longest time I used the same backdrop and I had been looking to buy some but they were so expensive, especially when you add shipping! I’m so glad finally made a couple more. I am already on the lookout for more! I hope you make one too!